> ## Documentation Index
> Fetch the complete documentation index at: https://docs.useocular.com/llms.txt
> Use this file to discover all available pages before exploring further.
# Quick-start
> Train your first custom YOLOv11 model in minutes.
# 🚀 Quick-start Guide
New to Ocular Foundry's model training capabilities? Follow this five-minute path to train and evaluate your
first custom model. Once you are comfortable, circle back to the advanced
pages for deep dives.
## 1. Requirements
| Item | Why you need it |
| --------------------------- | --------------------------------------------------------------- |
| At least one **Version** | Training uses the frames and annotations in a specific version. |
| **Member** role permissions | You must have member rights to launch training jobs. |
## 2. Open the **Training** tab
1. Navigate to the **Versions** tab in a project.
2. Select the version you wish to use to train the model
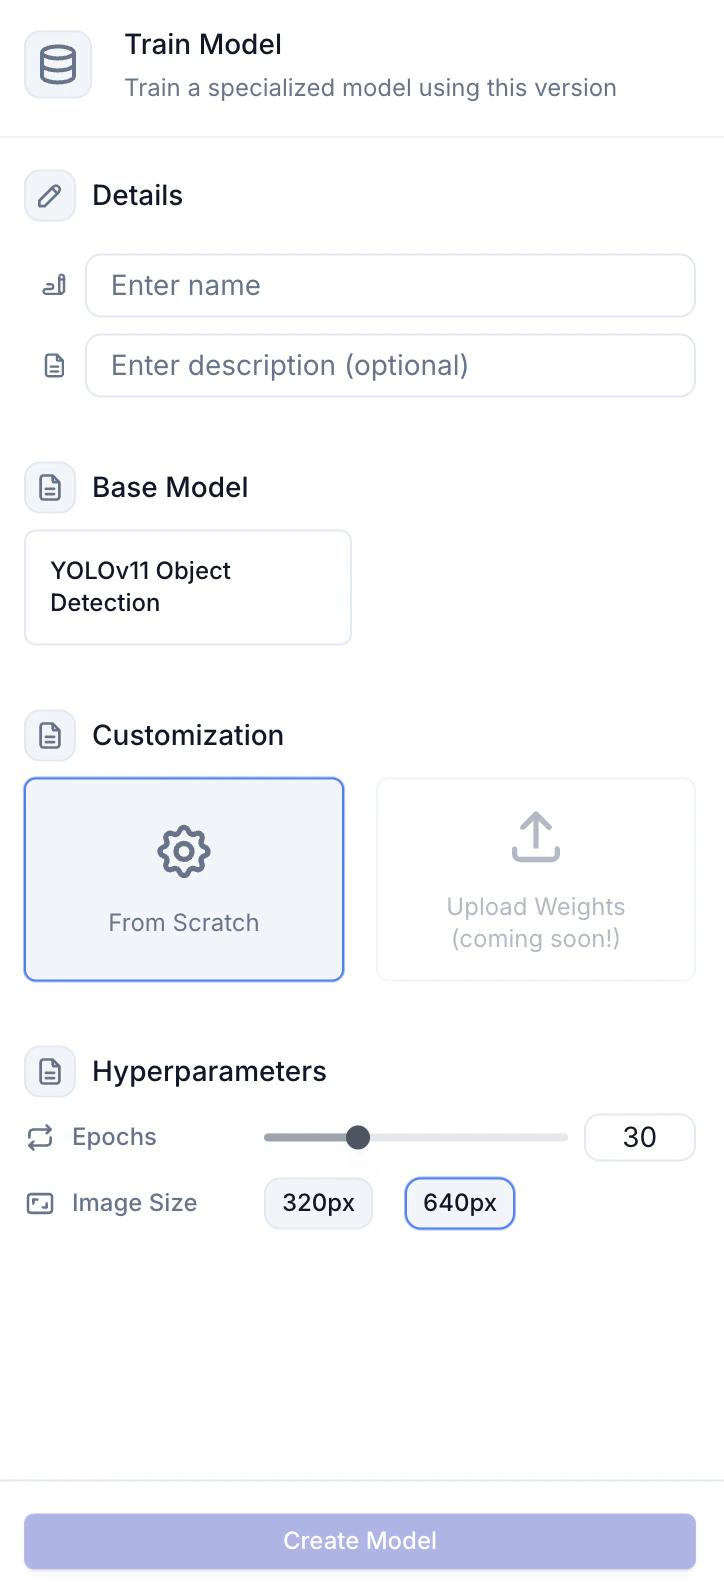
3. Click on the **Train** in the right-hand corner of that version's details page. You will see the following popup to configure and start a training run:
 ## 3. Adjust Configuration Settings
Choose the model type, model variant, number of epochs, and image size.
| Setting | Default | Rationale |
| ------------- | ------- | -------------------------------------------- |
| Model Variant | `m` | Best blend of speed and accuracy. |
| Epochs | `10` | Enough to verify the workflow. |
| Image Size | `640` | Detects small objects yet fits in 8 GB VRAM. |
YOLOv11 supports detection, segmentation, pose, classification, and oriented
bounding boxes (OBB). Ocular currently supports **detection** and **segmentation** models for object detection or segmentation project types, respectively; other types are
on the roadmap.
## 4. Click **Create Model**
You will be redirected to the "Models" tab, where the run appears instantly in **Model Training History** with a processing 🔵 status. When the training run has completed, it will have a competed 🟢 status.
## 5. Observe Performance Metrics
Performance Metrics and loss curves will be available on the model details page after the training run has completed 🟢 .
You will see the precision, recall, and mAP metrics over epochs, the confusion matrix, and previews of validation set data, and more.
That's it — you now own a custom detector fine-tuned on your data.
Next up:
* Fine-tune settings → [Model Training](/build-ai/model-training)
* Interpret metrics → [Model Evaluation](/build-ai/model-evaluation)
* Programmatic workflows → [Notebooks](/build-ai/notebooks)
## 3. Adjust Configuration Settings
Choose the model type, model variant, number of epochs, and image size.
| Setting | Default | Rationale |
| ------------- | ------- | -------------------------------------------- |
| Model Variant | `m` | Best blend of speed and accuracy. |
| Epochs | `10` | Enough to verify the workflow. |
| Image Size | `640` | Detects small objects yet fits in 8 GB VRAM. |
YOLOv11 supports detection, segmentation, pose, classification, and oriented
bounding boxes (OBB). Ocular currently supports **detection** and **segmentation** models for object detection or segmentation project types, respectively; other types are
on the roadmap.
## 4. Click **Create Model**
You will be redirected to the "Models" tab, where the run appears instantly in **Model Training History** with a processing 🔵 status. When the training run has completed, it will have a competed 🟢 status.
## 5. Observe Performance Metrics
Performance Metrics and loss curves will be available on the model details page after the training run has completed 🟢 .
You will see the precision, recall, and mAP metrics over epochs, the confusion matrix, and previews of validation set data, and more.
That's it — you now own a custom detector fine-tuned on your data.
Next up:
* Fine-tune settings → [Model Training](/build-ai/model-training)
* Interpret metrics → [Model Evaluation](/build-ai/model-evaluation)
* Programmatic workflows → [Notebooks](/build-ai/notebooks)